Common deployment mistakes in Microsoft Defender for Endpoint implementations
When initiating the deployment of Defender for Endpoint, it all commences with thorough preparation. It is crucial to conduct a comprehensive assessment of the existing environment to preempt policy conflicts and meticulously craft a solution that seamlessly aligns with the management methods, systems, and network configuration utilized within that specific environment. What are some of the common pitfalls to watch out for?
- Lack of Structure: Failing to establish a well-defined structure for Defender for Endpoint implementation.
- Incomplete Service Settings: Not correctly enabling all the necessary service settings.
- Inadequate Onboarding Plans: Neglecting to plan and implement a robust onboarding mechanism for endpoints.
- Policy Design: Not designing policies and deployments thoughtfully, leading to conflicts.
- Exclusion Issues: Migrating exclusions from other antivirus solutions without proper configuration.
- Defender AV Configuration: Incorrectly configuring Defender Antivirus settings.
- Insufficient Feature Understanding: Deploying it in a production environment without a thorough understanding of all its features.
- Misuse of Audit Mode: Using Audit Mode for protection in Microsoft Defender for Endpoint.
- Unnecessary Updates: Not realizing that updates may not be needed in passive mode.
- Underutilizing the Portal: Not leveraging the Defender Security Center portal fully, especially for incident and alert management.
- Ignoring Threat Analytics: Not making use of Threat Analytics to enhance security insights.
- Deployment on Unpatched Systems: Deploying Defender for Endpoint on systems that haven’t been properly patched.
- Server Automation: Fully automating Defender for Servers, including the AV configuration, without considering server-specific needs.
- Block at First Sight (BAFS) Misconfiguration: Misconfiguring the Block at First Sight feature, affecting threat detection.
- Emergency Updates: Relying solely on emergency (real-time) updates without a well-rounded cloud protection strategy
Structure in Defender for Endpoint
The Defender for Endpoint portal may appear straightforward at first glance, consisting of an onboarding method, device inventory, and a suite of features built on the collected data. However, for larger enterprises operating across multiple environments, geographic locations, or companies, the concept of device groups becomes paramount. These device groups serve a crucial role in facilitating more granular Role-Based Access Control (RBAC) management and providing enhanced visibility within reporting.
In scenarios where different IT teams are responsible for distinct sets of devices, a well-structured grouping framework is indispensable. Therefore, it is highly advisable to meticulously design a robust RBAC and device group structure within Defender for Endpoint. Such a structure offers efficiency in utilizing and reporting the platform’s features. Notably, indicators can be precisely scoped to specific device groups, and permissions can be tailored to individual groups, ensuring a more controlled and secure operational environment.
Service settings not correctly enabled
Customers started onboarding Defender for Endpoint without full protection enabled. Defender for Endpoint works based on a couple of features (Advanced Features) – without features enabled there is less protection or weakness in the product. Before starting with any onboarding of a machine, make sure the service settings are correctly enabled.
See my getting started guide here
Nor plan or design for the onboarding mechanism
When it comes to onboarding Defender for Endpoint, there is a multitude of options available. These include Intune, Group Policy Objects (GPO), PowerShell, Configuration Manager, Azure Arc, and Defender for Servers, among others. The key advice here is not to limit your focus solely to Defender for Endpoint but to explore the broader possibilities. For instance, Defender for Servers, Azure Arc, and Microsoft Intune offer a more extensive array of features that can significantly enhance your overall security landscape.
When opting for Azure Arc or Defender for Cloud, it’s crucial to coordinate with teams specializing in Azure and commence with a well-designed Azure landing zone. Another common oversight is related to Azure Arc agent updates.
The Azure Connected Machine agent undergoes regular updates to address bug fixes, improve stability, and introduce new functionalities. Recommendations for these agent updates can be found through Azure Advisor. Importantly, these updates are not automatically applied by the agent itself; they necessitate adjustments in the update process to ensure your environment remains secure and up-to-date.
Nor plan or design around policies or deployments
Indeed, when it comes to configuring settings on Windows, there are numerous tools at your disposal, including GPO, Intune, Configuration Manager, Local Policy, PowerShell, and more. To ensure a smooth operation and minimize conflicts, it’s essential to document the policies you’ve configured.
Before embarking on Defender for Endpoint projects, a comprehensive analysis of the existing configuration landscape is vital. Some common mistakes to avoid include:
- Defender AV Disabled via GPO/ Local GPO: Inadvertently disabling Defender Antivirus through Group Policy Objects or Local Group Policy.
- Microsoft Security GPO Baseline Conflicts with Intune: Encountering conflicts between Microsoft Security Group Policy Baselines and Intune policies.
- Configuration Manager Endpoint Protection Site Role Conflicts with Intune: Facing issues related to conflicts between Configuration Manager Endpoint Protection site roles and Intune policies.
When utilizing Intune and GPO in tandem, it can be beneficial to establish a deployment configuration that elevates the Mobile Device Management (MDM) policy’s priority. By default, when conflicts arise, GPO takes precedence. However, through the use of a custom policy, you can prioritize the MDM policy over GPO, providing more control and flexibility in your policy management. This ensures that your policies align with your desired configuration and minimize conflicts effectively.
MDMWinsOverGP is available via the following OMA-URI setting:
| OMA-URI | ./Device/Vendor/MSFT/Policy/Config/ControlPolicyConflict/MDMWinsOverGP |
| Data type | Integer |
| Value | 1 |
The setting is also available via the settings catalog with the name: MDM Wins over GP

Exclusions migrated from other AV solutions
This one is quite often visible in environments. Organizations used other third-party AV solutions for many years, resulting in many legacy exclusions. Never migrate the entire list from any other AV in Defender AV. Each AV works differently – add only exclusion when there is a critical need (performance issues/ compatibility issues).
When using exclusion make sure it is documented (ticket number, reason, troubleshooting details). Defining exclusions lowers the protection offered by Microsoft Defender Antivirus, so use exclusions only in situations when there is no other solution.
Defender AV not configured correctly
Common misunderstanding; we have the Defender for Endpoint sensor onboarded and all is good and protected. The sensor is reporting “healthy/active” in Defender for Endpoint and Defender AV is running.
Defender AV/ NGP/ ASR is part of Defender for Endpoint and must be configured. Without Defender AV correctly configured, there is a lack of protection; Cloud Protection, ASR, Network Protection, and many more settings depend on the AV component. See the following blogs:
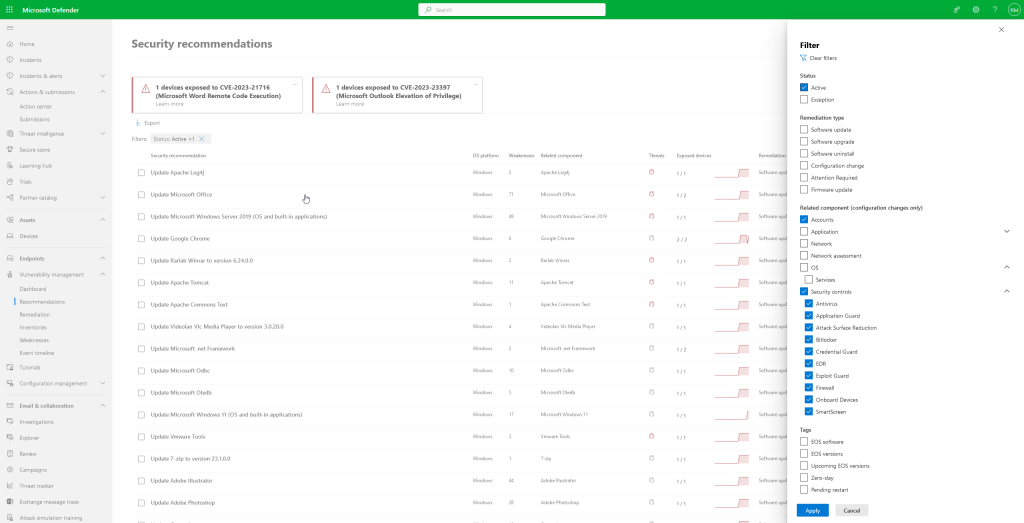
Tip: Use the security recommendation part of Defender for Endpoint
The first step in enrolling MDE is confirming that all configurations are compliant. Using Microsoft Defender Vulnerability Management it is possible to check the configured security controls for Antivirus, Application Guard, ASR, Bitlocker, Credential Guard, EDR, Exploit Guard, Firewall, SmartScreen, and the general onboarding state of MDE.
Use security recommendation data often and make it part of the IT process.
View via the portal: Go to recommendations and filter on the related component “Security controls” for viewing the compliance of all security controls policies.
For Attack Surface Reduction Rules – the recommendation insights are visible based on user impact information. User impact calculation is collected in the past 45 days and based on collected sensor telemetry.
Important: Recommendation is based on the enablement/disabled state of the feature. Specific settings (MAPS level, timeout) are not part of the result/ check. Always confirm the baseline and correct MAPS settings with in-depth testing of the machines (simulations/ validation) See:
Deploying it in production without understanding all the features
Essential for the IT teams to understand the features part of Defender for Endpoint. Based on real experiences by organizations there is often knowledge by the full IT team. Train users and make sure all features are explained (including service desk teams). Examples:
- What is EDR in Block Mode
- What is MAPS/ Cloud Protection
- What is PUA protection
- How to exclude feature xx in the portal or configuration
- How works Tamper Protection
- What is audit mode/ block mode
Most of the weakness starts with IT knowledge (Excluding complete folders; disabling AV features, offboard machines, not knowing the detection logic/ agent features) – make sure the team is informed and “knows” the products in-depth including all sub-features.
Audit mode is doing protection in MDE
Common situation; we have some components (ASR/ Network Protection, PUA) in audit mode and are safe. Nope, audit mode is not doing any protection in MDE. It collects in some cases audit events, all there is no actual block.
Attack Surface Reduction (ASR) is always tricky and requires some fine-tuning. Don’t use audit mode for months; after configuring audit mode review the events and plan the enablement in block mode. Don’t use audit mode for years when not needed, since ASR is enabling additional protection controls.
In cases for ASR where the rule is not compatible with the environment; enable always audit mode instead of disabling the rule. With the use of audit mode, all data is collected and available via Advanced Hunting.
Updates are not needed in passive mode
When using Defender for Endpoint/ Defender AV in passive mode/ EDR in block mode it is still required to update the agent with the correct updates. Make sure the signature updates/ platform updates and Sense updates are deployed.
Not using the portal (waiting for incidents/alerts)
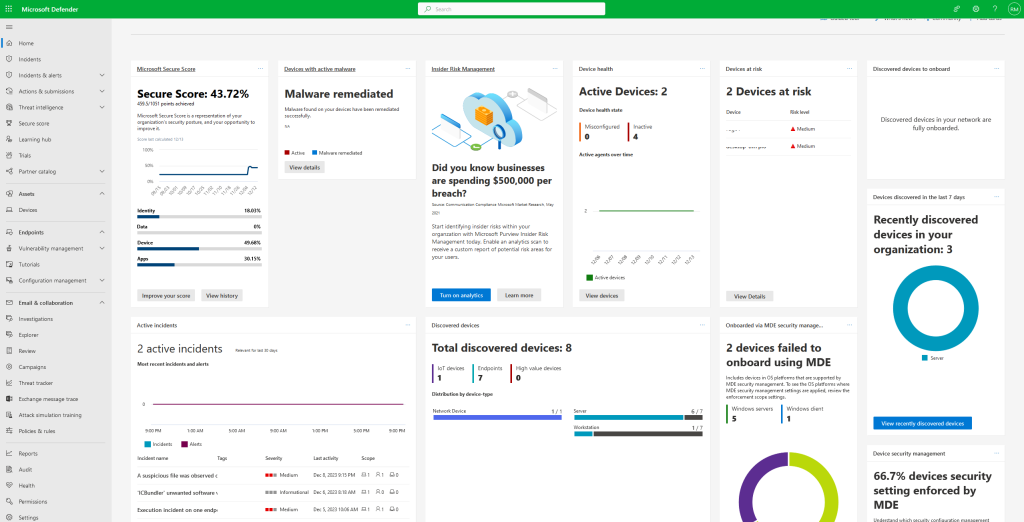
Defender for Endpoint is installed on all machines and up and running, there is no need to use the portal – only in cases when there is an alert. Not true; When Defender for Endpoint is correctly deployed there are many insights. After deploying it is important to use all data, start with hunting,/ exploring events, and use the data in Defender Vulnerability Management for patching all systems. More information later in this blog for the usage and insights
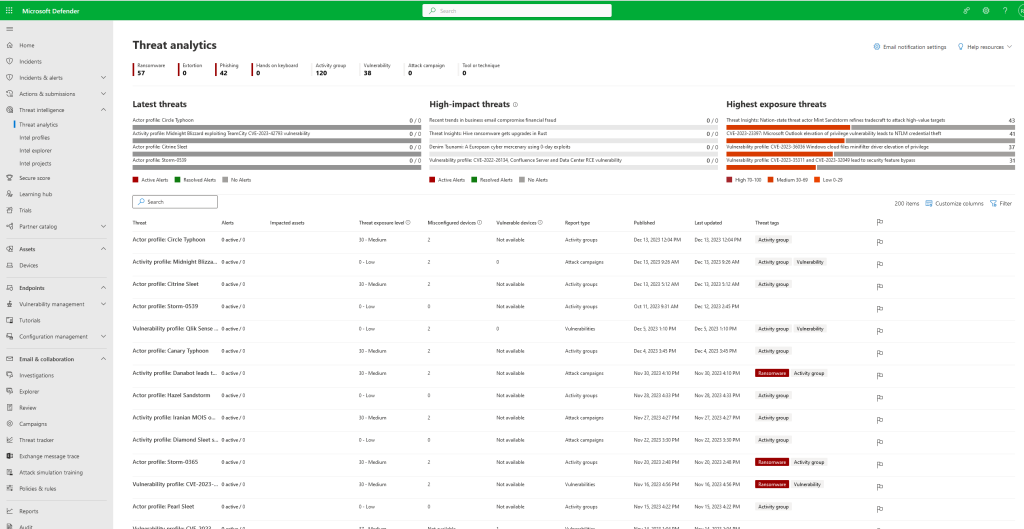
Not using Threat Analytics
The threat analytics part of Defender for Endpoint is important. Threat analytics is a feature with in-depth information from Microsoft security research and automated insights for possible impacted assets and available mitigations. In the Analyst report section, there is a detailed expert write-up available with in-depth information about the attack techniques and used KQL queries for hunting.
Deploy to unpatched systems
When starting with the deployment of Defender for Endpoint – make sure all systems are correctly updated to one of the latest updates. Based on experience there are many possible issues when systems are not on the correct level.
When the Servicing Stack Update (SSU) and Latest Cumulative Update (LCU) are correctly updated it will result in easier onboarding. Based on experience; Server 2016 gives a couple of issues when the SSU/ LCU is not updated to a specific version.
Defender for Servers
When using Defender for Servers there is still configuration needed for the Defender for Endpoint configuration. Defender for Servers starts only the onboarding via provisioning – it is still needed to configure additional components (AV, ASR, Firewall e.d). Ideally, use the new MDE security settings management for managing servers centralized via Intune.
Misconfiguration of block at first sight (BAFS)
Block at first sight (BAFS) is a threat protection feature of the Defender AV/ NGP component and detects new malware and blocks it within seconds. BAFS relies on a couple of configurations.
- Cloud protection
- Sample submissions (Send all samples automatically/ send safe samples automatically)
- Cloud extended timeout period (recommended to use 50)
The combination of the above three settings enables block at first sight (BAFS). Block at first sight detects new malware and blocks it within some seconds. To get BAFS enabled it is needed to configure the above configuration. When all items are configured Block at first sight is correctly enabled.
Emergency updates
Microsoft Defender Antivirus uses cloud-delivered protection/ MAPS) to periodically download dynamic security intelligence updates to provide more protection. These dynamic updates are pushed automatically. Microsoft is able to push emergency updates via MAPS. Make sure that cloud-delivered protection is correctly enabled.
Knowing the unknown with device discovery
Ideally, there is a CMDB where all assets are available and correctly registered. In almost all environments, there are “unknown” devices. New onboarded machines outside the process/ test machines or playgrounds are often. For Defender for Endpoint and the threat landscape, it is critical to make sure all devices are covered by Defender for Endpoint.
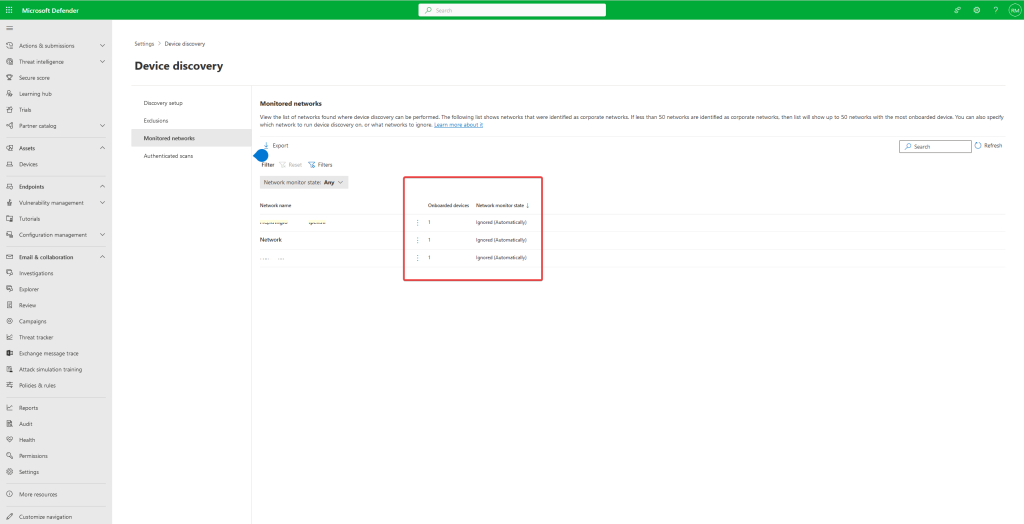
With the use of Defender for Endpoint Device Discovery it is possible to discover the unmanaged part of the network. Microsoft Defender for Endpoint provides a device discovery capability based on onboarded endpoints to collect, probe, and scan the network to discover unmanaged devices.
The logic detects corporate networks and excludes private networks automatically. It is possible to manually exclude networks or devices from scanning.
Currently, it supports:
- Endpoints
- Network devices (Routers/ switches)
- IoT devices (printers, cameras, scanners)
Defender for Endpoint supports two configurations of discovery (Basic discovery and Standard discovery).
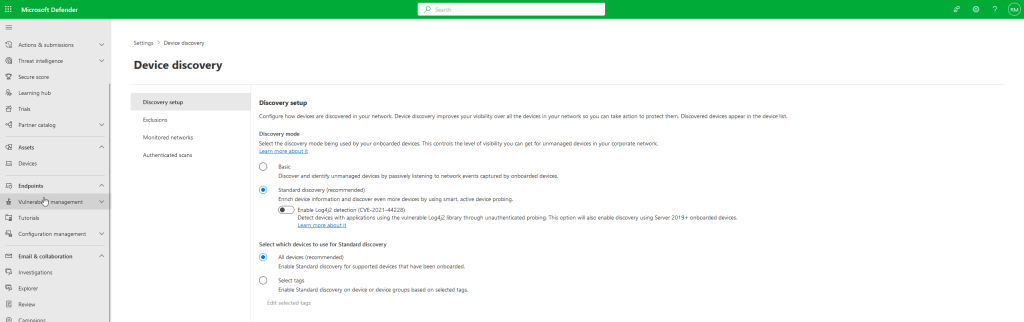
Standard discovery is recommended. This method is based on smart active probing to discover additional information. Standard discovers minimal information using the SenseNDR.exe.
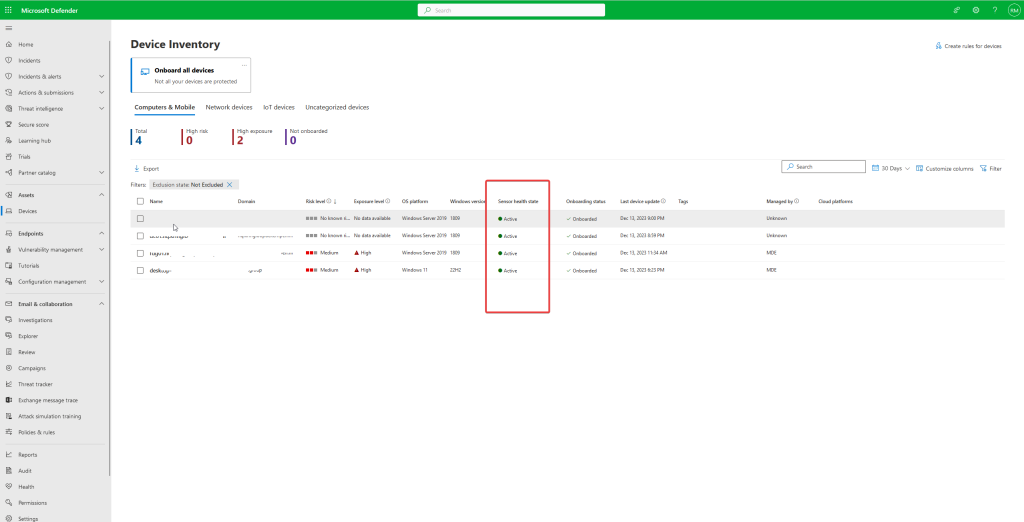
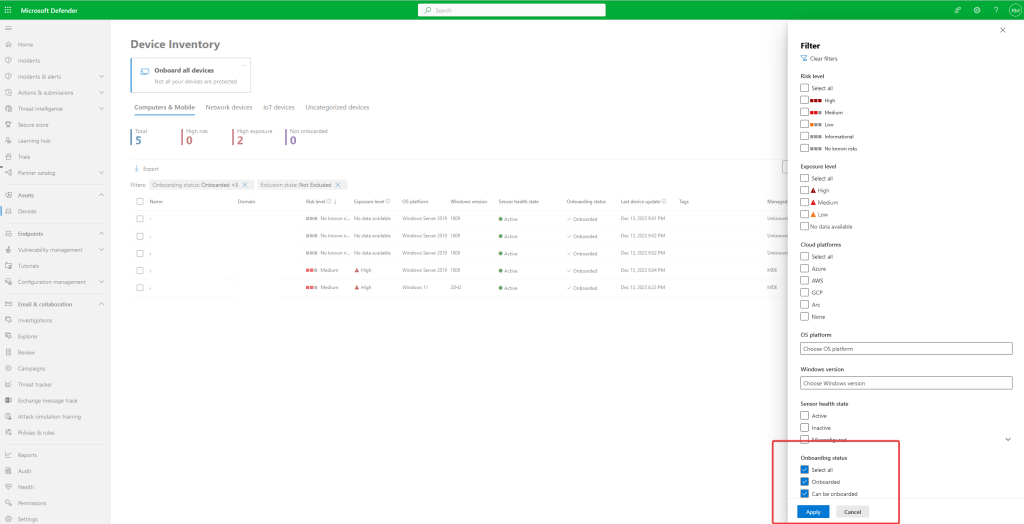
All devices are visible in the device inventory – filter for can be onboarded/Unsupported/Insufficient info state for MDE-related devices.
Authenticated scans
Microsoft Defender for Endpoint device discovery can scan the network based on endpoints. With the use of the authenticated network device discovery more in-depth scanning is possible based on dedicated MDE devices and SNMP authentication for deeper analysis. Authenticated scans will be explained in a separate blog.
The device discovery feature is critical for the Automatic Attack Disruption feature.
With the leverage of Defender for Endpoint device discovery and containment, it is possible to detect unmanaged devices and block incoming/outgoing communication with the suspected device. With this approach the contain action is way more powerful, since attackers can use unmanaged devices as part of the network.
Attackers leverage mostly unmanaged devices for performing advanced attacks. With the use of device contain it is possible to contain the unmanaged devices, even when the machine is not onboarded to Defender.
For the contain and attack disruption functionality it is needed to configure the standard discovery mode. This discovery is active and based on common discovery protocols/ multicast with smart active probing.
Using the portal and all available data/ insights
Defender for Endpoint is not an “install, roll-out, and completed” product. The main work starts when all devices are onboarded and data is collected. I have seen many organizations rolling it out quickly and forgetting all the features part of Defender for Endpoint.
Maintaining Defender daily is critical and needed for getting most of the benefits out of the product. It starts with a couple of main parts:
- New incidents/ Alerts
- New Vulnerabilities
- New threat reports
- Responding to incidents
- Patch vulnerabilities
Vulnerability management
With the use of the Defender for Endpoint sensor it collects vulnerabilities. There are many vulnerabilities, and managing them all is not possible. Prioritizing the work based on the impact score. MDE knows the number of CVEs and the exploit that is being actively exploited in the wild.

| Tip: Create an update/vulnerability process; ideally create a team for reviewing the vulnerabilities daily/ weekly and update all software/ perform actions. Try to make the exposure score lower by patching the most critical recommendations. |
Focus not only on software vulnerabilities, all software configurations are useful for making the endpoint baseline more strict. When there are device groups configured it is easy to give separate insights based on the device groups (Servers/ Linux/ Windows Endpoints e.d)

Review automated actions and portal activities
Automated investigation/ device quarantine and some other AV-related actions can be useful. In some cases, Defender for Endpoint detects and remediates automatically files. When alerts are automatically resolved it is not always visible. With the use of the action center, there are more insights available.
The action center is not only scoped on “new” actions; all historic actions are available via the History tab. Action center is available via Actions & submissions:

History contains all performed actions. This view contains for example the isolated device feature/ quarantine file action part of the automated investigation or AV quarantine items:

The quarantine file action contains all related information and allows the security team to restore the quarantine file actions for specific actions or all instances.

For quarantine file actions there is a “devices by” field. When the field is filled in with Automation the file is automatically quarantined. Microsoft Defender AV is scoped on items quarantined by the Defender AV process.

Live response auditing?
The action center contains auditing for the live response feature. When opening the investigation page for a live response command action it shows the complete historical view and performed commands:

The investigation page contains an image snapshot of the console and command log including all performed actions and commands. All data is visible; including the session started/ session ended and total duration.

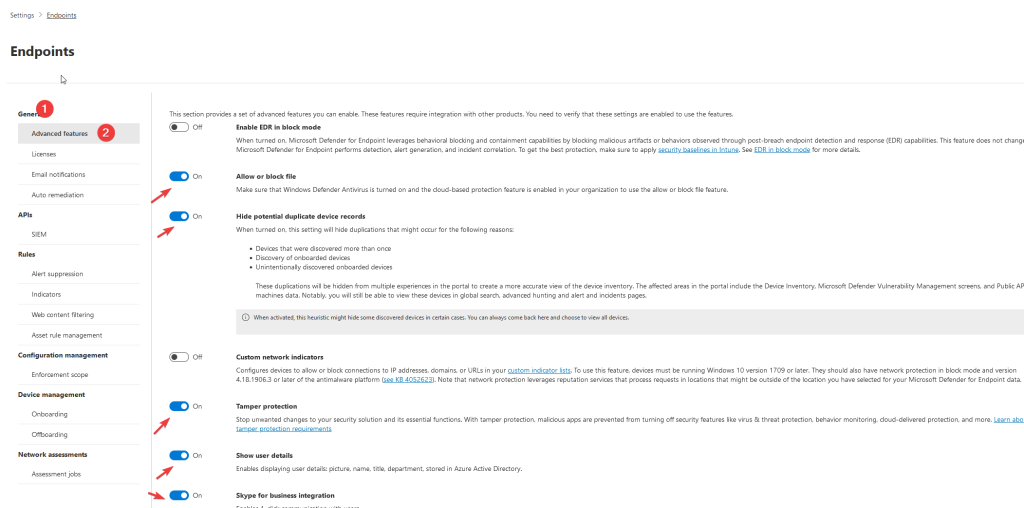
Common mistake; No tamper protection
There are still organizations not enabling tamper protection for the following reasons;
- We need to manage devices
- Developers are allowed to add/ change settings
- Performance issues
There is no reason for disabling tamper protection; each machine needs to be protected with tamper protection against malicious changes in the Defender AV/ EDR solution. Without Tamper Protection it is easy to bypass core protection features.
As already mentioned in the series; there are for Windows a couple of ways of enabling tamper protection:
- Via Defender for Endpoint portal – advanced features
- Via Microsoft Endpoint Manager Intune
Advanced features: Enabled via advanced features part of security.microsoft.com

Intune: Using Microsoft Defender Antivirus profile in the Endpoint Security – Antivirus blade

Recently Microsoft announced the new tamper protection feature for exclusions. If you manage exclusions exclusively through Intune with both tamper protection and DisableLocalAdminMerge enabled, there is protection for exclusions where exclusions are managed by Intune. Exclusions are managed when configuring:
- DisableLocalAdminMerge
- Tamper Protection is deployed using Intune
| Tip: Deploy tamper protection using the Intune configuration and Defender for Endpoint service settings. Deploy both so exclusions are protected and there is always a fallback when the cloud protection service is not available. Tamper protection via security.microsoft.com requires cloud protection to be fully enabled. |
Based on my opinion tamper protection must be always enabled. The new troubleshooting mode can be used during troubleshooting situations to disable the features for troubleshooting. Sometimes customers like to disable Microsoft Defender during troubleshooting and not configure tamper protection, which makes a security cap. The new troubleshooting mode is fixing this request, where teams have more flexibility. View the in-depth troubleshooting blog here.
Local admin
When using an endpoint with local admin permissions it is recommended to restrict the following registry location: ( to avoid policy changes)
Computer\HKEY_LOCAL_MACHINE\SOFTWARE\Policies\Microsoft\Windows Defender\Policy Manager
This registry location can be restricted with a custom policy in Intune/ GPO or other systems. For Intune use a custom OMA-URI profile and configure the following value:
| OMA-URI | ./Device/Vendor/MSFT/Defender/Configuration/HideExclusionsFromLocalAdmins |
| Data type | Integer |
| Value | 1 |
HideExclusionsFromLocalAdmins restricts the view. If the value is set to 1, it blocks all access to the policy location:

Common mistake; No updates deployed
Defender for Endpoint requires a couple of monthly/daily updates for getting new features and updates. Important to make sure the updates are working correctly and are accepted.
When using WSUS/ Configuration Manager; try to move to more modern solutions – based on real experience all issues start with WSUS/ Configuration Manager and corrupt update packages. Issues with syncing the catalog, corrupt databases, and no maintenance. Try to move to a cloud-managed distribution (MicrosoftUpdate) for at least the signature updates.
Defender for Endpoint/ Defender AV needs to be updated with recent updates. The following updates are important. Don’t forget KB5005292 which is required for the 2012R2/ 2016 EDR sensor part of the unified agent.
| Update | KB | Description |
|---|---|---|
| Update for Defender antimalware platform (AmProductVersion) | KB4052623 | It is critical to make sure Defender platform is updated with the latest version, for getting the latest technology and features |
| Security Intelligence updates | KB2267602 | Defender AV requires Security Intelligence Updates/ Signature updates |
| Update for EDR sensor (2012R2/ 2016) | KB5005292 | This update includes updates and fixes to the EDR sensor that is used by MDE for 2012R2/ 2016 |
Common mistake; Exclusions
Before starting with deploying Defender for Endpoint make sure the preventions as already explained are correctly configured:
- DisableLocalAdminMerge
- Tamper Protection
- HideExclusionsFromLocalAdmins (when users are local admin)
In Intune, DisableLocalAdminmerge can be configured using the setting “Disable Local Admin Merge” configure the setting to the following: (I know it is a bit confusing with the name convention in Intune)

When configured on “Disable Local Admin Merge” the local exclusion list added via local Group Policy, PowerShell UI is not merged with the effective policy.
Each vendor shares most of the time a large list of exclusions. A good example of Veaam advice; excluding the complete C:\Program Files\Veeam\ folder. Good job!! All it is great for running malware directly from a folder (-;
Even when the vendor shares a large list of exclusions review each exclusion, based on experience most of the applications run well without the vendor-recommended exclusions. When needed use procmon/ performance analyzer or more in-depth toolings for checking specific paths. More information:
Add only exclusion when there is a critical need (performance issues/ compatibility issues). And never, never migrate old exclusions!!
When using exclusion make sure it is documented (ticket number, reason, troubleshooting details). Defining exclusions lowers the protection offered by Microsoft Defender Antivirus.
Explanation of the exclusions is not part of the MDE series with a reason. Fabian Bader published an in-depth exclusions guide with almost all related information. Must read!!!
Fabian Bader/ Cloudbrothers.info: The Hitchhiker’s Guide to Microsoft Defender for Endpoint exclusions
Common mistake; Only network protection configured without SmartScreen
Network protection is critical in combination with Defender for Endpoint network indicators and web content filtering. For blocking indicators the Network protection feature must be enabled in block mode. Network protection is an attack surface reduction capability, and prevents access to dangerous domains or custom-blocked indicators.
The network protection component of Defender for Endpoint identifies and blocks connections to C2 infrastructures used in ransomware attacks. Blocking C2 attacks makes Network Protection more important.
Enable SmartScreen for Edge and include the SmartScreen potentially unwanted app feature (removes the yellow warning of Defender). Don’t forget to enable SmartScreen for all components (Windows Explorer)
For Microsoft Edge browsers Defender SmartScreen must be enabled.
Always test and confirm the protection state – this validates that the actual configuration is working correctly on the endpoints.
Common mistake; disabling auto-remediation
Currently, 5 different levels of remediation are available. Full automation is recommended and has been configured by default since 2021 for new tenants. I still see environments where the automated investigation is completely disabled for all machines.

When AIR is disabled (No automated response) there is no automated investigation. Full automation has proven to be reliable, efficient, and safe, and is recommended for all customers. Full automation frees up your critical security resources so they can focus more on your strategic initiatives.
When full automated response is not possible – configure at least one of the semi-levels. Avoid disabling AIR completely, since this lacks in the protection and attack disruption capabilities.
Common mistake; Not using Advanced Hunting/ Custom detections
Advanced Hunting is powerful. Out of the box Defender for Endpoint is not alerting for all activities. Advanced Hunting is powerful enough to create additional detection and close the detection caps. Since a lot of data can be found in the Advanced Hunting dataset.

With custom detections, you can proactively monitor for and respond to various events and system states, including suspected breach activity and misconfigured endpoints, and automate response actions. With the availability of data, there are many use cases to use the customs detection capabilities.